|
Mark Create a Copper Arbor
Let no man say that a copper arbor got the best of me. This was a long project. It took me two full days to finish, and there were times when I wasn't sure if I would. But, gosh darn it, I did it. I had planned to put in another garden plot. But when the rain decided not to agree with me, I had to change plans. The side of my house was deep in mud, so there was no real way to haul things back and forth between the front and back yards. I knew I want an arbor for vines to grow on and I thought I would make a wood one. After looking arbors on the internet, I found some copper arbor that I thought were very cool. My goodness, I couldn't believe how much they cost! Very simples ones cost over $500. Well, I wasn't about to pay that. I knew from my previous experience of building a water fountain, that I could do it better and cheaper. I found a plan at Rebecca's garden website. I downloaded the PDF file, estimated how much copper I needed, and off to Lowe's I went. POST-PRODUCTION NOTES:
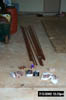
Step One: Buy your stuff For this project, here's what I got and the prices. You should double check this for accuracy.
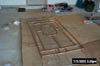
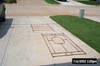
Only buy straight copper pipe for this project. Trying to straighten out the soft rolled copper would be difficult. I would suggest shopping around to find inexpensive copper pipe. I probably could have saved five dollars buy doing so. Also, the more complicated the project, the more joints and pipe, and more money. I might have saved $20 or $30 dollars by doing a simple ladder-type project. Several of my neighbors came by why I was cutting the pieces. They asked if I was going to solder the joints. I can't imagine how long that would have taken. Step Two: Cut your copper I followed the instructions on the website, dry-fitting all the pieces as I went. All I had for a cutting table was my ladder, which worked very well, thank you.
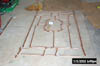
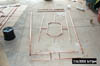
Step Four: Glue pieces together Make sure everything still fits together correctly. I originally bought quick-setting copper bond. This was a bad idea. It's very difficult to wipe off excess material. It also sets quickly. So if you goof-up, which I obviously did, you can't undo it. Finding a way to quickly apply the epoxy to the pipe is a learned skill. Unfortunately, I really didn't figure it out until I was almost finished. Be sure to wipe of excess epoxy as you go. You will need a flat places to put everything together.
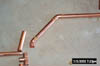
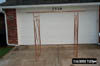
Step Five: Piece it all together and enjoy!
This project took me two full days to complete. Some of it was not having the right tools (vise), some of it was lack of expertise (none), and some of it was the complexity of the design (very). I'm glad I did it, but I won't do it again. Way too much work and expense. It's going to be cover in vines eventually, so I'm not sure it was worth the extra effort. But, I digress. I just need to find a bench to go underneath it, and I'm done.
|